
The Pen Tool
By: Mark Galer
For more info visit his site.
The Pen Tool is not one of the selection tool, it creates vector paths instead of selections, however we can convert it into selections that in turn can be used to extract or mask group of pixels.
Basic Drawing Skills
Click pen tool also select those things as have showned

The pen can draw a vector shape whilst filling it with a color and applying a layer style all at the same time but we will not focused on that rather we will use pen tool to turn selection that in turn can be used to extract or mask group of pixels.
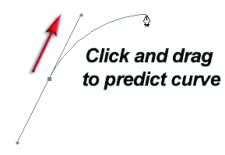
Basics Step 1
Go to File > New and create a new blank document. Choose ‘White’ as the ‘Background Contents’. Size is not really important (no really—in this instance anything that can be zoomed to fill the screen will serve your purpose). Click on the Pen Tool (double-check the ‘Paths’ option, rather than the ‘Shape layers’ option, is selected in the Options bar) and then click and drag (hold down the mouse clicker as you drag your mouse) in the direction illustrated above. The little black square in the center of the radiating lines is called an anchor point. The lines extending either side of this anchor point are called direction lines, with a direction point on either end, and that thing waving around (courtesy of the Rubber Band option) is about to become the path with your very next click of the mouse.
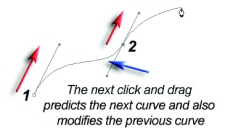
Basics Step 2
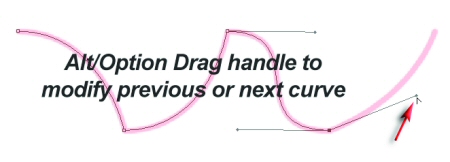
Make a second click and drag in the same direction. Notice how the dragging action modifies the shape of the previous curved line. Go to the ‘Edit’ menu and select ‘Undo’. Try clicking a second time and dragging in a different direction. Undo a third time and this time drag the direction point a different distance from the anchor point. The thing you must take with you from this second step is that a curve (sometimes referred to as a Bézier curve) is both a product of the relative position of the two anchor points either side of the curve, and the direction and length of the two direction lines (the distance and direction of the dragging action).
Basics Step 3
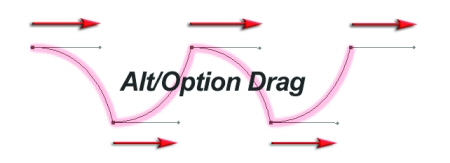
Scenario one: Let us imagine that the first click and drag action has resulted in a perfect curve; the second dragging action is not required to perfect the curve but instead upsets the shape of this perfect curve—so how do we stop this from happening? Answer: Hold down the Alt key (PC) or Option key (Mac) and then drag away from the second anchor point to predict the shape of the next curve. This use of the Alt/Option key cancels the first direction line that would otherwise influence the previous curve.
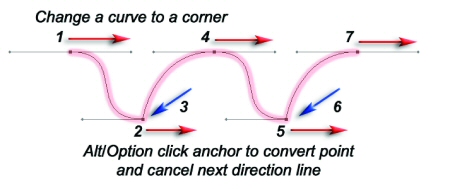
Scenario two: Let us imagine that we have created the first perfect curve using two normal click and drag actions (no use of a modifier key). The direction lines that are perfecting the first curve are, however, unsuitable for the next curve—so how do we draw the next curve whilst preserving the appearance of the first curve? Answer: The last anchor point can be clicked whilst holding down the Alt/Option key.
This action converts the smooth anchor point to a corner anchor point, deleting the second direction line. The next curved shape can then be created without the interference of an inappropriate direction line. Note: The information that you need to take from this third step is that sometimes direction lines can upset adjacent curves. The technique of cancelling one of the direction lines using a modifier key makes a series of perfect curves possible. These two techniques are especially useful for converting smooth points into corner points on a path.
Basics Step 4
Just a few more steps and we can go out to play. It is possible to change direction quickly on a path without cancelling a direction line. It is possible to alter the position of a direction line by moving the direction point (at the end of the line) independently of the direction line on the other side of the anchor point. To achieve this simply position the mouse cursor over the direction point and, again using the Alt/Option key, click and drag the direction point to a new position.
Basics Step 5
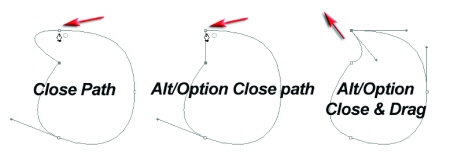
If this path is going to be useful as a selection, it is important to return to the start point. Clicking on the start point will close the path. As you move the cursor over the start point the Pen Tool will be accompanied by a small circle to indicate that closure is about to occur. You will also notice that the final curve is influenced by the first direction line of the starting anchor point. Hold down the Alt/Option key when closing the path to cancel this first direction line. Alternatively, hold down the Alt/Option key and drag a new direction line to perfect the final curve.
Basics Step 6
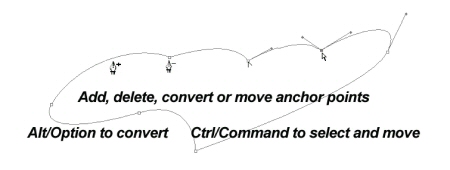
When a path has been closed it is possible to add, delete, convert or move any point. Although these additional tools are available in the Tools palette they can all be accessed without moving your mouse away from the path in progress. If the Auto Add/Delete box has been checked in the Options bar you simply have to move the Pen Tool to a section of the path and click to add an additional point (the pen cursor sprouts a plus symbol). If the Pen Tool is moved over an existing anchor point you can simply click to delete it.
Holding down the Ctrl key (PC) or Command key (Mac) will enable you to access the Direct Selection Tool (this normally lives behind the Path Selection Tool). The Direct Selection Tool has a white arrow icon and can select and move a single anchor point (click and drag) or multiple points (by holding down the Shift key and clicking on subsequent points). The Path Selection Tool has to be selected from the Tools palette and is able to select the entire path.
Basics Step 7
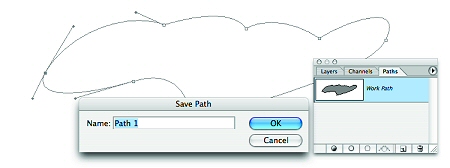
The final step in the creation of a Path is to save it. All Paths, even Work Paths, are saved with the image file (PSD, PDF, PSB, JPEG or TIFF). If, however, a Work Path is not active (such as when the file is closed and reopened) and then the Pen Tool is inadvertently used to draw a new Path, any previous Work Path that was not saved is deleted. Click on the Paths palette tab and then double-click the Work Path.
This will bring up the option to save and name the Work Path and ensure that it cannot be deleted accidentally. To start editing an existing Path click on the path in the Paths palette and then choose either the Direct Selection Tool or the Pen Tool in the Tools palette. Click near the Path with the Direct Selection Tool to view the handles and the Path.
Tuesday, November 20, 2007
Saturday, November 3, 2007
Cartoon like Drawing using Photoshop Image Effect
Cartoon like Drawing using Photoshop CS2 Image Effect
1. Open your pictures you want to be modified. Make sure your image is in RGB mode. To check this go to Image under the menu bar Mode = RGB Color.
Make a duplicate of this layer by pressing Ctrl+J altogether..

2. Now we will be applying the Poster Edges filter. To do this, go to Filter > Artistic > Poster Edges.
3. After the Poster Edges effect, we will Adjust the Brightness & Contrast with the values: go to Image>Adjustment>Brightness/Contrast. Brightness Value: 12 Contrast's value: 32.
4. Now we will do a cut out effect to give it that cartoon look. Go to Filter > Artistic > Cut Out. And this is what you will get! enjoy!!!

Friday, November 2, 2007
How to turn photos into a sketch/drawing
Start with your selected photo.

STEP 1 - Duplicate The Background Layer
First duplicate the background layer by pressing Ctrl+J simultaneously or you can go to Layer> New> Layer via Copy. Now we have 2 layers, the Background Layer, and Layer 1.
STEP 2 - Desaturate The Photo
With Layer 1 selected press Ctrl+D or you can go to Image> Adjustments> Desaturate. This gives us a grayscale version of the photo.
STEP 3 - Duplicate Layer 1
At this point you must duplicate Layer 1. With Layer 1 selected press Shift+Ctrl+U simultaneously or you can go to Layer> New> Layer via Copy. Now we have 3 layers, the Background Layer, Layer 1 and Layer 2.
Next we'll be working with Layer 2.
STEP 4 - Invert Layer 2
With Layer 2 selected press Ctrl+I simultaneously or you can go to Image> Adjustments> Invert. This will make your photo look like a negative.
STEP 5 - Change The Layers Blend Mode To Color Dodge
In the Layers Palette change the Layers Blend Mode for this layer (Layer 2) to Color Dodge. This will make your photo almost completely white, but don't panic! Everything will going to work out just fine.
STEP 6 - Apply The Gaussian Blur Filter
go to Filter> Blur> Gaussian Blur. When the dialog box appears start by moving the Radius Slider all the way to the left. Once you've done that you can start to slowly move it to the right.
you will notice that as you move the slider your sketch will start to appear. take experiment and enjoy! that's all folks
Saturday, October 20, 2007
Keyboard Shotcuts Part3
Image Menu
Action/Windows/Mac
Adjust Levels/Ctrl+L/Cmd+L
Adjust Auto Levels/Ctrl+Shift+L/Cmd+Shift+L
Adjust Auto Contrast/Ctrl+Alt+Shift+L/Cmd+Option+Shift+L
Adjust Curves/Ctrl+M/Cmd+M
Adjust Color Balance/Ctrl+B/Cmd+B
Adjust Hue/Saturation/Ctrl+U/Cmd+U
Desaturate/Ctrl+Shift+U/Cmd+Shift+U
Extract/Ctrl+Alt+X/Cmd+Option+X
Invert/Ctrl+I/Cmd+I
Friday, October 19, 2007
What is in the Photoshop interface?

Adobe Photoshop is a powerful tool for editing photographs and graphics. The first step in learning Photoshop is to familiarize yourself with the Photoshop interface, which consists of five basic components:
1) Menu Bar — contains all of Photoshop’s available options
2) Toolbox — has various tools for editing the image
3) Options Bar — set the options for the currently selected tool
4) Palettes — various panes to control different aspects of the project. Includes layers, channels, paths, history, etc.
5) Image Area — the currently open image Each component is labeled as posted:
Thursday, October 11, 2007
Keyboard Shortcuts Part2
Edit Menu
Action/Windows/Mac
Copy/Ctrl+C/Cmd+C
CopyMerged/Ctrl+Shift+C/Cmd+Shift+C
Cut/Ctrl+X/Cmd+X
Free Transform/Ctrl+T/Cmd+T
Keyboard Shortcuts/Alt+Shift+Ctrl+K/Option+Shift+Cmd+K
Paste/Ctrl+V/Cmd+V
Paste Into/Ctrl+Shift+V/Cmd+Shift+V
Step Back in History/Ctrl+Alt+Z/Cmd+Option+Z
Step Forward in History/Ctrl+Shift+Z/Cmd+Shift+Z
Undo/Ctrl+Z/Cmd+Z
Photoshop guru's love their keyboard shortcuts. so if you wanna fell good on it and save time while using Photoshop why not check out the list and see what's best for you.
File Menu
Action/Windows/Mac
Close/Ctrl+W/Cmd+W
Close All/Ctrl+Shift+W/Cmd+Shift+W
Exit/Quit/Ctrl+Q/Cmd+Q
Jump to ImageReady/Ctrl+Shift+M/Cmd+Shift+M
Help /F1/F1
New /Ctrl+N/Cmd+N
New Layer /Ctrl+Shift+N/Cmd+Shift+N
Open /Ctrl+O/Cmd+O
Open As /Ctrl+Alt+O/n/a
Page Setup/Ctrl+Shift+P/Cmd+Shift+P
Print/Ctrl+P/Cmd+P
Save/Ctrl+S/Cmd+S
Save As/Ctrl+Shift+S/Cmd+Shift+S
Save a Copy/Ctrl+Alt+S/Cmd+Option+S
Save for Web/Ctrl+Alt+Shift+S/Cmd+Option+Shift+S